#Generate JSON database creation script
Explore tagged Tumblr posts
Visit Tumblr Blog
Explore Tumblr blogs with no restrictions, modern design and the best experience.
Last Seen Tumblr Blogs


Fun Fact
Forty percent of Tumblr users are between the ages of 18 to 25.
Text
Exploring the World of Full-Stack Development with Python

In today's rapidly evolving technological landscape, the demand for versatile and skilled developers is higher than ever. Among the myriad of programming languages and frameworks available, Python has emerged as a standout choice for full-stack development.
Its simplicity, readability, and extensive library support make it an ideal language for building comprehensive applications that span both front-end and back-end development. In this article, we will delve into the world of full-stack development with Python and explore the role of a Python full-stack developer.
What is full-stack development?
Full-stack development refers to the practice of working on both the front-end and back-end aspects of a web application. A full-stack developer is proficient in creating user interfaces, managing databases, handling server-side logic, and ensuring seamless integration between different components of a web application. This holistic approach enables developers to have a deep understanding of the entire development process, making them invaluable assets in any development team.
Why Python for Full-Stack Development?
Python is a versatile programming language that has gained immense popularity due to its ease of use and powerful capabilities. Here are some reasons why Python is an excellent choice for full-stack development:
Readability and Simplicity: Python's clean and straightforward syntax allows developers to write code that is easy to read and maintain. This reduces the likelihood of errors and makes collaboration among team members more efficient.
Extensive Libraries and Frameworks: Python boasts a rich ecosystem of libraries and frameworks that simplify various aspects of development. For instance, Django and Flask are two popular web frameworks that enable developers to build robust back-end systems quickly and efficiently.
Versatility: Python is a general-purpose language, which means it can be used for a wide range of applications, from web development to data analysis, machine learning, and automation. This versatility allows full-stack developers to leverage Python for various tasks within a project.
Strong Community Support: Python has a vibrant and active community of developers who contribute to its continuous improvement. This ensures that developers have access to a wealth of resources, tutorials, and support when working on their projects.
Key Technologies for Python Full-Stack Developers
To become a proficient Python full-stack developer, it's essential to be familiar with a range of technologies and tools. Here are some key technologies that play a crucial role in full-stack development with Python:
Front-End Technologies:
HTML and CSS are the building blocks of web development used to create the structure and style of web pages.
JavaScript is a powerful scripting language that adds interactivity and dynamic behavior to web applications.
Frameworks: React, Angular, and Vue.js are popular front-end frameworks that facilitate the creation of responsive and user-friendly interfaces.
Back-End Technologies:
Django is a high-level Python web framework that encourages rapid development and clean, pragmatic design. It comes with built-in features like an ORM, authentication, and an admin panel.
Flask is a lightweight and flexible Python web framework that is easy to get started with and highly customisable.
SQLAlchemy is a SQL toolkit and Object-Relational Mapping (ORM) library for Python that simplifies database interactions.
Databases:
PostgreSQL is a powerful, open-source relational database system that supports advanced data types and performance optimization.
MySQL is another widely used relational database known for its reliability and ease of use.
MongoDB is a NoSQL database that stores data in a flexible, JSON-like format, making it ideal for handling large volumes of unstructured data.
Version Control:
Git is a distributed version control system that allows developers to track changes, collaborate on code, and manage project versions effectively.
Deployment and DevOps:
Docker is a platform for containerising applications, ensuring consistency across different environments.
CI/CD: Continuous Integration and Continuous Deployment pipelines automate the process of testing, building, and deploying applications.
The Role of a Python Full-Stack Developer
A wears many hats, working on both the client-side and server-side components of a web application. Their responsibilities include:
Front-End Development: Creating responsive and intuitive user interfaces using HTML, CSS, and JavaScript frameworks. This involves designing the layout, implementing user interactions, and ensuring cross-browser compatibility.
Back-End Development: Building and maintaining server-side logic, APIs, and database interactions using frameworks like Django and Flask. This includes handling authentication, data storage, and business logic.
Database Management: Designing and managing databases, writing efficient queries, and ensuring data integrity and security.
API Integration: Developing and integrating APIs to enable communication between different parts of the application and with external services.
Testing and Debugging: writing unit tests, conducting thorough testing, and debugging issues to ensure the application runs smoothly and efficiently.
Deployment and Maintenance: Deploying applications to production environments, monitoring performance, and performing regular maintenance and updates.
Conclusion
The field of full-stack development is dynamic and ever-evolving, and Python has proven to be a powerful tool in a developer's arsenal. Its simplicity, versatility, and robust ecosystem make it an excellent choice for building comprehensive web applications. As a Python full-stack developer, mastering a wide range of technologies and staying updated with industry trends is crucial for delivering high-quality, scalable, and user-friendly applications. Whether you're a seasoned developer or just starting your journey, exploring full-stack development with Python opens up a world of opportunities and challenges that are both rewarding and exciting.
0 notes
Text
Automating SSAS script only backups with C# for Tabular and Multi-Dimension Models
Automating SSAS script only backups with C# for Tabular and Multi-Dimension Models
I was recently asked to create a SQL job to automate the backing up of our SSAS cubes from several servers but unlike the standard SSAS backups, the business didn’t want the data backed up, they only wanted the schema/code as they needed daily backups. The full backup with data would have used up too much space.
Initially, I thought it’d be a piece of cake, just had to Google it, right (while…
View On WordPress
#Generate JSON database creation script#Generate XMLA database creation script#Script Out SSAS#SSAS Backup
0 notes
Text
VeryUtils PHP Web File Manager is a best and useful file manager for web
VeryUtils PHP Web File Manager is a best and useful file manager for web, written in JavaScript using jQuery and jQuery UI. Creation is inspired by simplicity and convenience of Finder program used in Mac OS X operating system. VeryUtils PHP Web File Manager script helps you manage files with others in secure and simple way using your own PHP host. VeryUtils PHP Web File Manager helps you quickly create multimedia file management applications. Supports thumbnails with customizable dimensions, easy integration with editors like TinyMCE, CKEditor, etc. Built-in auto-push to Google Drive for archiving.

Simple File Uploader and Explorer is a simple PHP Script to upload files and manage them. The drag and drop file uploader is the main feature of this script. It allows you to upload multiple files very fast and easy way. All files are stored in a writable folder (fileFolder). Once the files are uploaded they can be viewed in Download Files section. Also you can search files, view thumbnails and Download Files.
VeryUtils PHP Web File Manager is the ultimate file and document manager. Manage your files in the cloud with desktop-like intuitive features such as dragging files to a folder, moving files to other folders or even deleting them. Try out the demo today, preview a PDF, Word, Excel and PowerPoint document or move the files around just like you do on your desktop and see how easy it is to use! Enjoy and thank you for looking.
VeryUtils PHP Web File Manager Features:
Without require MySQL and other databases.
No Database Used for users, so Simple to Integrate.
Usability like the MacOS Finder or Windows Explorer.
Mobile friendly view for touch devices.
All operations with files and folders on a remote server (copy, move, upload, create folder/file, rename, etc.)
High performance server backend and light client UI.
Multi-root support.
Local file system, MySQL, FTP, Box, Dropbox, GoogleDrive and OneDrive volume storage drivers.
Support AWS S3, Azure, Digital Ocean Spaces and more with League\Flysystem Flysystem driver.
Cloud storage (Box, Dropbox, GoogleDrive and OneDrive) drivers.
Background file/folder upload with Drag & Drop HTML5 support.
Chunked file upload for large file.
Upload directly to the folder.
Upload form URL (or list).
List and Icons view.
Keyboard shortcuts.
Standard methods of file/group selection using mouse or keyboard.
Move/Copy files with Drag & Drop.
Drag & Drop to outside by starting drag with alt/option key press.
Archives create/extract (zip, rar, 7z, tar, gzip, bzip2).
Rich context menu and toolbar.
Quicklook, preview for common file types.
Edit text files and images.
"Places" for your favorites.
Calculate directory sizes.
Thumbnails for image, movie files.
Thumbnail view of uploaded files.
Easy to integrate with web editors (elRTE, CKEditor, TinyMCE).
Flexible configuration of access rights, upload file types, user interface and other.
Extensibility by event handling of backend and client side.
Simple client-server API based on JSON.
Supports custom information in info dialog.
Configuable columns of list view.
Supports custom CSS class function for the custom folder icon.
Connector plugin.
AutoRotate : Auto rotation on file upload of JPEG file by EXIF Orientation.
AutoResize : Auto resize on file upload.
Normalizer : UTF-8 Normalizer of file-name and file-path etc.
Sanitizer : Sanitizer of file-name and file-path etc.
Watermark : Print watermark on file upload.
Integrated with WYSIWYG API capable editors: CKEditor, FCKeditor (D6, D7), TinyMCE (D6, D7), BUEditor, jWYSIWYG (D6), YUI, WYMeditor.
Multiple file upload.
File copying/moving with Drag & Drop support.
Quick file and directory rename.
Lightbox-preview for images, music, media.
Context menu with generic file/directory operations.
Inline text file editing.
Favorites directory list.
Directory selection history.
Working with archives.
File descriptions.
Drag and Drop file upload.
Drupal file table integration (including Private filesystem support).
Search for filenames.
Visual image resize, crop and rotation.
Role based access control.
Online preview support for PSD, md, html, office docs (by Google/Microsoft online tools), CAD, etc.
Token support for file paths and labels.
VeryUtils PHP Web File Manager Requirements:
jQuery / jQuery UI
jQuery 1.8.0+
jQuery UI 1.9.0+
Required: draggable, droppable, resizable, selectable, button and slider.
Recommend: sorter (To make sortable the List column and the Places).
Client
Modern browsers both of desktop or mobile. VeryUtils PHP Web File Manager was tested in newest Chrome, Edge, Firefox, IE and Opera.
Server
Any web server
PHP 5.2+ (Recommend PHP 5.4 or higher) And for thumbnails - GD / Imagick module / convert(imagemagick) require.
Recommend PHP 7.1 or higher to supports non-ASCII character of file path/name on the Windows server.
0 notes
Text
Most Popular SQL Interview Questions For Basic To Advanced
These SQL Interview Questions are completely dedicated to Modernization of the way we used to maintain records has changed drastically, a lot of data being generated nowadays are in the form of pictures or videos that have become our sole source of keeping memories intact for many years to come. Similarly, multiple organizations and firms have employed a similar method in storing the company data in the form of digitized documents stored away in Database Management Systems (DBMS) which require a special style of language to mine or extract data that the company wishes to extract from its database and here where SQL comes in.
What is SQL?
Structured Query Language (SQL) is a domain-specific programming language that is utilized by skilled professionals to manage data stored in the company’s database. SQL skills are in high demand in the market and serve as the foundational basics for any professional looking for a job or brighter prospects in the data industry. Here are a set of SQL Interview Questions that we believe you should prepare for SQL before going for an interview.
Here are Popular SQL Interview Questions & Answers Lists:-
Q1. Describe a DBMS?
Database Management System (DBMS) is software that is solely responsible for creating, controlling, maintaining, and use of a database. DBMS may be defined as a folder that manages data in a database rather than saving a file in the system.
Q2. Define an RDBMS?
RDBMS abbreviates for Relational Database Management System. It is categorized with the storage of data into a compilation of tables, which are linked by similar topics between the columns of a table. It aids the user with relational operators to influence the data stored in the tables.
Q3. Describe SQL?
SQL abbreviates to Structured Queried Language and aids the operator to communicate with the database. It is a standard operating language that helps execute responsibilities such as recovery, updating, incorporating, and expunging data from the database.
Q4. Define a Database?
It is a structured table of data made to easily access, store, retrieve, and manage data.
Q5. Describe MySQL?
It is a multi-threaded, multiuser structured query language database management system with more than 11 million installations across the globe. The language is the second most well-known and popularly used open-source database programming in use.
MySQL is an oracle-sponsored relational database management system (RDBMS) built on structured query language. It is supported by several operating systems which include Windows, LINUX, iOS, etc.
Q6. My SQL has been written in which language?
C & C++ are the languages in which MySQL has been written
Q7. Mention the technical specifications of MySQL?
Below are the technical specifications of MySQL:-
Drivers
Flexible structure
Geospatial support
Graphical tools
JSON support
OLTP and transactions
High performance
Manageable and easy to use
MySQL Enterprise Monitor
MySQL Enterprise Security
Replication and high availability
Security & storage management
Q8. Describe the difference between SQL and MySQL?
SQL stands for structured query language and is used to interact with databases like MySQL
MySQL is a database management system used for the structured storage of data
A PHP script is needed to store and mine data from this database
SQL is a computer language whereas MySQL is an application
SQL is used for the creation of various Database Management Systems (DBMS)
Q9. Distinguish between the database and a table?
There are 4 noticeable differences between a database & a table:-
Tables showcase structured data in a database, whereas a database is a collection of tables
Tables are grouped with relations to create a dataset; the dataset forms the database.
Data stored in the table in any form is part of the database, but the other way around is not possible.
A table is a collection of rows and columns used to store data, whereas a database is a collection of organized data and features used to access tables.
Q10. Distinguish between Tables and fields?
A table is a compilation of cells that are structured in a model which eventually form tables and rows. Columns may be categorized as a vertical collection of cells and rows may be categorized as a horizontal collection of cells.
There is also a reference to the cells laid out in a column to create an entity also termed a field once a header is provided to the so-called column.
A field may have several rows which may constitute a record.
E.g.
Table name:- Employee
Field name’s:- Emp ID, Emp Name, Date of Birth
Data:- 2866, Daniel Decker, 29/02/1984
Q11. What is the purpose of using a MySQL database server?
Below are some of the reasons why MySQL server is so famous with its users:-
MySQL is an open-source database management system that is free of charge for private developers and small enterprises.
MySQL’s community is vast and supportive, thus any issues faced are resolved at the earliest.
Has multiple stable versions available
It extremely quick, dependable and is beginner-friendly
The download is free of cost
Q12. Describe the various tables present in MySQL?
There are majorly 5 tables present in MySQL: –
MyISAM
Heap
Merge
INNO DB
ISAM
Q13. How can an Operator install MySQL?
There are multiple ways of installing MySQL in one’s system, but the best way to do it is manual. The manual installation allows the user to gain a better understanding of the system and aids in an additional grasp of the database. There are several benefits linked to the manual installation of MySQL:-
Reinstalling, creating backups, or moving databases can be achieved in less than a minute.
Provides precise control over how and when MySQL closes or starts.
MySQL can even be installed in a USB drive
Q14. How can a user check the MySQL version?
In WINDOWS MySQL command-line tool shows the version information without using any flags, but for a piece of more detailed information the operator may always feed in the below-mentioned command
MySQL> SHOW VARIABLES LIKE “%version%”.
and it will show a detailed discretion of the version of SQL that the user is using.
Q15. How to add columns in MySQL?
Several cells in a table are what may constitute a column and a set of cells in a column constitutes a row. To add columns in MySQL, the following statement of ALTER TABLE may be used:
ALTER TABLE table_name
ADD COLUMN column_name column_definition [FIRST|AFTER existing_column].
Q16. In MySQL how can you delete a table?
The drop table statement not only removes the data in the table, but it also removes the structure and definition from the database permanently. Thus, the user needs to be extremely careful whilst using this command, the reason is that once deleted there is no recovery option in MySQL. The command is as follows:-
DROP TABLE table_name
Q17. Define a Primary Key?
A primary Key may be described as a compilation of fields that meticulously define a row. This is a Unique Key and has an unspoken NOT NULL constraint, implicating Primary keys cannot have NULL values.
Q18. Define a Unique Key?
This key provides a separately pre-defined constraint that exclusively distinguishes every record in the database which insinuates a distinctiveness for the column or the set of columns.
Q19. Define a Foreign Key?
This is a key that can be linked to the Primary Key of another table. Connections need to be fabricated between the two tables by providing a reference to the foreign key with the primary key of another table.
Q20. Describe a Join?
It is a keyword utilized to question data from multiple tables established on the connections between the fields of the table. Keys play a crucial part when JOINs are employed.
Q21. Describe the multiple ‘JOIN’ and explain each?
JOIN’s are tools that help the user retrieve data and depend on the links between tables. Following are the types of ‘JOIN’ used in SQL:-
Inner JOIN – This JOIN is used to return rows with at least a single match of rows between tables
Right, JOIN – This JOIN helps return rows that are similar between tables and all rows of the right-hand side table. To simplify this JOIN returns all rows from the right-hand side table irrespective of any matches from the left-hand side table.
Left JOIN – This JOIN helps return rows that are similar between tables and all rows of the left-hand side table. To simplify this JOIN returns all rows from the left-hand side table irrespective of any matches from the right-hand side table.
Full JOIN – This JOIN returns rows if there are any similar rows in any of the tables. So basically, this JOIN returns all the rows from both the right-hand and left-hand side tables.
Q22. Define Normalization?
It is the procedure of reducing redundancies and dependencies by structuring fields and tables of a database. The primary motive of ‘Normalization’ is to add, modify, and delete that can be merged into a single table.
Q23. Define De-Normalization?
It is a method employed to gain access to data from higher to lower normal types of databases. It is also a way of implementing redundancy into a table by integrating data from the correlated tables.
Q24. Distinguish the multiple normalizations?
Normalizations may be dissected into 5 forms:-
First Normal Form (1NF) :- It helps in eliminating all identical columns from a table which aids the formation of tables for the associated data and recognition of distinctive columns.
Second Normal Form (2NF):– Meeting all the obligations of the 1NF. Retaining the subsets of data in separate tables and the creation of relations between tables using primary keys.
Third Normal Form (3NF):– This shall meet all the constraints of 2NF and eradicate the columns which are not reliant on the primary key limits.
Fourth Normal Form (4NF):– Meeting all the obligations of the 3NF and it shall not have multi-valued dependencies.
Q25. Define a View?
The view is a computer-generated table that comprises a subsection of data enclosed in a table. Views are NOT virtually present and require a lesser amount of storage capacity. The view can have data of one or more tables pooled in one and depends on the connection.
Q26. Define an Index?
An index is a routine tweaking method to permit faster reclamation of records from a table. An Index designs an entry for every value which makes data recovery quicker.
Q27. Describe the distinct kinds of Indexes?
There are primarily 3 types of Index’s:-
Unique Index – This style of Indexing does not grant the field to have identical values if the column is uniquely indexed. This Index can be used spontaneously once the primary key is defined.
Clustered Index – This style of index rearranges the raw order of the table and searches based on key values. Each table may consist of only one Clustered Index.
Non-Clustered Index – Non-Clustered Index does not modify the raw order of the table and retains the plausible order of data. Each table may consist of 999 non-clustered indexes.
Q28. Define a Cursor?
A database cursor is a command which facilitates a cross-over of the rows/records in a table. This may be visible as a hint to one row in a collection of rows. It is extremely useful for traversing the retrieval, addition, and removal of database archives.
Q29. Define a Database relationship and what are they in SQL?
It is defined as the link between the tables in a database. There are several database-based relationships, and they are as follows:-
One to One relationship
To Many relationships
Many to One relationship
Self-referencing relationship
Q30. Describe a Query?
A database query is a code created to recover information from the database. The query may be fabricated in a way to match the user’s expectation of the result set which may simply be a question to the database.
Q31. Describe a Subquery?
As the word describes, it is a query inside a query. The exterior query is known as the – Main Query and the innermost query is called a Subquery. Subqueries are forever implemented first and the outcome from the Subquery is then passed on to the main query.
Q32. Describe the types of Subqueries?
There are majorly 2 styles of subqueries:-
Correlated Subquery – These cannot be considered as independent queries but may refer to the column in a table listed in the FROM the list of the main query.
Non-Correlated Subquery – These may be considered as independent queries and the output of these subqueries may be substituted in the main query.
Q33. Define a Stored Procedure?
This procedure is a function that comprises several SQL statements to access the DBMS. Multiple SQL statements are compiled into a ‘Stored Procedure’ and may be employed anywhere as per requirement basis.
Q34. Define a ‘Trigger’?
The trigger is a code that automatically executes with some event on a table or with a view in a database. E.g., On the joining of a new hire, new records need to be entered in fields like employee ID, Name, Date of birth, etc.
Q35. Distinguish between DELETE and TRUNCATE commands?
DELETE command is utilized to delete rows from the table and a WHERE clause may be applied for a provisional set of considerations. Commit and Rollback may be executed post deletion of the statement.
TRUNCATE deletes every row from the table. Truncate control cannot be turned backward.
Q36. Define Local and global variables and describe their disparities?
Local variables are the variables that can be applied or occur within the function. They are unknown to the other functions and cannot be referred to or utilized. Variables can be established whenever the functions are called.
Global variables are the variables that can be employed or be present all over the program. An identical variable proclaimed in a global variable cannot be utilized in functions. Global variables cannot be established whenever a particular function is called.
Q37. Define a CONSTRAINT?
A constraint may be employed to restrict the data type of a table. It may also be specified at the time of creating or altering the table. Some examples of constraints are:-
NOT NULL
CHECK
DEFAULT
UNIQUE
PRIMARY KEY
FOREIGN KEY
Q38. Define Data Integrity?
It defines the precision and consistency of the data stored in a database. It may also identify integrity constraints to implement business guidelines on the data when it is registered into the application or database.
Q39. Describe auto Increment?
This enables the operator to fabricate a new number to be generated when a record is inserted into the table. AUTOINCREMENT keyword may be used in Oracle and IDENTITY keyword may be used in an SQL SERVER.
This keyword is used when the primary key is used.
Q40.Distinguish between Cluster and Non-Cluster Index?
Cluster Index is employed for the convenient recovery of data from the database by adjusting the way the records are stored. A database sorts out rows by columns which are destined to be Clustered Index.
A non-Clustered Index does not adjust the way data was stored in the database, rather fabricates a completely different entity inside the table. It usually points back to the original table rows after investigating.
Q41. Describe a Datawarehouse?
It is a fundamental storehouse of data from numerous data sources. Data are collected, transformed, and made available for mining and online processing. Warehouse data have a subcategory of data dubbed as Data Mart.
Q42. Define a Self-Join?
It is a query employed to evaluate itself. It is utilized to assess values in a column with other values in the same column and table.
Q43. Define a Cross-Join?
Cross join describes as a query to calculate the results of the number of rows in the first table multiplied by several rows in the second table. If a WHERE clause is applied in a cross join, then the query will act like an INNER JOIN.
Q44. Describe User Defined functions and their types?
User-defined functions are fabricated to create logic whenever required. It is not required to write the same logic multiple times. Rather, the function may be called or deployed at any given point in time.
There are 3 styles of User-defined functions:-
Scalar Functions – returns unit, return clause defined by variant
Inline table-valued functions, return table as a return
Multi-statement valued functions returns table as a return
Q45. Describe Collation?
It describes as a compilation of guidelines that establish how character data may be categorized and compared. It can be used to assess A and other language characters, also depending on the width of the characters.
all values may be used to compare these character data.
Q46. Describe the distinct styles of Collation sensitivity?
These are the different types of collation sensitivities:-
Case Sensitivity – A & a, and B & b.
Accent Sensitivity
Kana Sensitivity – Japanese Kana characters.
Width Sensitivity – Single-byte & double-byte character.
Q47. Define recursive Stored Procedure?
A stored procedure that demands by itself until it achieves some kind of boundary condition. This recursive function or procedure helps computer operators use the identical set of codes ‘n’ number of times.
Q48. How can a user add foreign keys in MySQL?
This is the key to linking one or more tables together in MySQL. It helps in matching the primary key field of another table to connect the two tables. It allows the user to have a parent-child relationship within the tables. This can be executed either way:-
Using the CREATE TABLE command
Using the ALTER TABLE command
Following is the syntax used to define a foreign key using CREATE or ALTER TABLE
[CONSTRAINT constraint_name]
FOREIGN KEY [foreign_key_name] (col_name, …)
REFERENCES parent_tbl_name (col_name, …)
Q49. Describe how can the user create a database in MySQL workbench?
To do so the initial step would be to:-
launch the MySQL workbench and log in using a username and password
Choose the Schema menu from the navigation tab
Right-click under the schema menu and pick the ‘Create Schema’ option.
Or
Click on the database icon ( similar to a barrel)
A new dialog box would appear
After filling in all the details in the dialog box
Click on Apply and Finish to complete the database creation.
Q50. How can the user create a Table in MySQL workbench?
Launch the MySQL workbench
Go to the navigation tab
Choose the ‘Schema Menu’ which will showcase all the previously created databases
Select any database and right-click on it
In the sub-menus, we need to select the tables option
Right-click on the tables sub-menu
Choose ‘Create table Option’
some useful links are Below:
To Know more about the SQL Certification Course visit – Best SQL Certification Course
Must visit our official youtube channel To Get FREE Technical knowledge skills - Analyticstraininghub
To know more about our Most Demanded Technical skills Based Courses visit - Analyticstraininghub.com
#tricky sql queries for interview#tricky sql queries for interview pdf#scenario based sql interview questions#sql queries interview questions
0 notes
Link
What is MEARN Stack Development?
Just knowing basic net technologies isn’t enough to be an expert net developer. MEARN represent MongoDB, ExpressJS, AngularJS, React JS and Node JS wherever within the entire stack – front, face and info all are running within the JavaScript.
MongoDB : information in MongoDB is keep in key-value pairs in JSON format known as documents, that are roughly like rows in RDBMS. Multiple documents are keep in what’s known as a set in MongoDB.
AngularJS : Angular is one in every of the foremost powerful and performance-efficient JavaScript frameworks to make single-page applications for each net and mobile. The powerful options of Angular enable North American nation to form advanced, customizable, modern, responsive and easy net applications.
ReactJS : React JS may be a JavaScript library for making user interfaces, creating development of UI parts simple and standard. React JS library helps North American nation to make the computer program of such massive applications.
Node.js : Node.js may be a JavaScript runtime to make quick climbable network applications. Node.js helps North American nation to use JavaScript within the server aspect secret writing.
ExpressJS : categorical is that the hottest framework for making net applications in Node.js. categorical are often outlined as quick, minimalist, unopinionated net framework for Node.js.
LAMP Stack net Development
LAMP represent UNIX operating system, Apache, MySQL, PHP. LAMP Stack net Development is associate open supply net development platform that uses UNIX operating system because the software system, Apache is employed as an online server, MySQL is employed as an on-line database management system and PHP is employed as Object-oriented scripting language. Rather than PHP, we will conjointly use Perl and Python.
Linux : UNIX operating system may be a multi-user, multitasking and open supply software system. UNIX operating system acts as associate interface between the appliance software system and hardware. You’ll be able to realize UNIX operating system software system principally in servers, and conjointly in several areas like smartphones, cars, home appliances etc.
Apache : Apache net server is a free and ASCII text file software system developed and maintained by the Apache software system Foundation. Apache protocol Server is written in C, XML. It’s wont to processes requests and serves up net assets via protocol, in order that the appliance is accessible to any or all United Nations agency are accessing the general public domain on a straightforward net uniform resource locator.
MySQL : MySQL may be a widespread Open supply {relational info|electronic database|on-line database|computer database|electronic information service} Management System (RDBMS) that helps in developing database for any application in a very made-to-order manner.
PHP : PHP stands for machine-readable text preprocessing is employed to style and develop dynamic and interactive websites. PHP is server aspect scripting language – PHP scripts are run at server. PHP is Interpreter primarily based – Scripts are processed on every occasion it’s run. There’s no compiled output.
Comparison
Now as we all know what each stack consists, we will compare.
Database
LAMP stack uses MySQL, a really widespread enterprise level {relational info|electronic database|on-line database computer database|electronic information service} whereas MEARN uses MongoDB conjointly a really widespread NoSQL database that uses JSON-like JavaScript Object Notation) syntax.
Server Language
A very fascinating one! LAMP stack uses PHP to speak to its server that is Apache whereas in MEARN we tend to use NodeJS that is Runtime JS to speak to NodeJS Server). I do know you’ll be thinking, what in the world will he mean? Few years back we tend to were solely able to run JavaScript on consumer aspect i.e. browser which means it had been solely able to manage information in frontend.
So NodeJS in MEARN equals to PHP & Apache in LAMP
Backend Framework
A server-side language may be a blessing, however, a server-side framework may be a heaven. This can be the purpose wherever the stacks goes bit off, PHP has framework Laravel, Symphony, etc.) and it is similar case for NodeJS however the distinction is that the framework for NodeJS is a component of MEARN stack i.e. ExpressJS. This implies we’d want additional things for LAMP stack to realize similar result.
The bitter truth behind backend framework is we tend to don’t want it, for e.g. NodeJS doesn’t need ExpressJS to form protocol server and same goes for Apache doesn’t want Laravel. Thus, essentially ExpressJS in MEARN and Laravel in LAMP simplifies the creation and development of servers.
Frontend Framework
This is the foremost awkward one in every of all as a result of we tend to don’t have Frontend Framework for LAMP stack. This can be as a result of the LAMP stack style design is additional server primarily based instead of consumer base, whereas MEARN has ReactJS or AngularJS for Frontend/Client aspect.
This sums up the comparison of all 3 stacks in regard to Frontend, Backend Frameworks, Server Language and info.
But the ultimate question still remains that stack ought to I choose?
Well there’s no correct answer to the current question, however MEARN Stack covers all the net application parts whereas LAMP lacks in some areas. Hence, with the Best MEARN Stack Training in Kochi mastering would be typically be easy. A new issue to note is MEARN Stack is build with JavaScript which suggests you merely ought to recognize one programing language rather three.
MEARN is unquestionably the much-needed technology of the long run. MEARNSTACK is one among the trending programs that each developer wishes to master. MEARN Stack courses in Kochi by real operating professionals is an additional edges to take up MEARN Stack developer as a well-known job profile.
0 notes
Text
Toon Boom Harmony Mac Download

Toon Boom Harmony 17 Download
Toon Boom Harmony 20.0.1 Premium Crack Free Download Mac/Win Toon Boom Harmony 20.0.1.16044 Crack is the most dynamic programming, presenting an important bunch of gadgets to create 3D and execute 2D exercises. Interest and take in this incredible application used as a piece of films like the Simpsons, the Rugrats, the Lion King, Titan AE. Toon Boom Harmony Premium 2020 Free Download. Snap-on underneath catches to begin Toon Boom Harmony Premium 2020 Download. This is a finished disconnected installer and independent arrangement for Toon Boom Harmony Premium 2020. This would be viable with 64-piece windows. Toon Boom Harmony 17 Crack Keygen Serial Key Free Download! Toon Boom Harmony Crack is the most & famous movement programming. Moreover, it is a Graphics software. It is the best software in the world that is use to design 3D or 2D graphics with The network of artists working in TV, film, promoting, and gaming.
Toon Boom Harmony 16.0 Crack Latest + Torrent Download 2019
Toon Boom Harmony Crack is a program which focuses on animation creation. It is the industry professional, for digital 2D animation. Toon Boom Harmony Crack behaves as a storyboarding program. It is introduced by ‘Toon boom animation Inc. The program is helpful for movies, televisions and web animations. You can easily control your cut out, and paperless frame by frame workflows.
It can also handle traditional and classical animation work station. The program supports you from scanning to composing a 2D or 3D combination. Toon Boom Harmony Torrent contains pencil lines with textures and changing functions. You can get the 2D camera and 2D-3D combination. It consists of particles, built-in composer and morphing options. The program directly animates the steps, in two points. https://crispydeersweets.tumblr.com/post/643221087182848000/mac-os-x-1010-yosemite-dmg-download.
Free youtube to mp3 converter download mac. You can also ketch your ideas, automatically into the software. When you complete your drawing, the program will fill up in exact mouth movement, for sounds you import. Toon Boom Harmony 16 Crack is a great time saver software. The users can upload their paper drawing in more than 13 several file types. Json to excel converter download mac. You can also import one cell and frame or total project in several ways. It also helps to import the project in AVI, an mp4 video files for television paly back.
Toon Boom Harmony Serial Key Features:
Therefore the program is helpful for sports, mobile devices, and training apps.
It is widely used in the education system.
Using the graphics tablet, you can create animation automatically into the program.
Sprites tool helps to produce new characters. In this way, you can animate easily your stories.
Another program offers you comprehensive control for your design and other creations.
‘Bone rigging’ helps to apply character transitions, like a natural-looking.
‘Onion-skinning’ allows handling the movement and timing of animations. This option will display you the previous drawings and the next movement. In this way, you can easily create an effective and plane motion.
‘Animation pegs’ helps to chart the ways of character movement.
‘Lip syncing’ option allows you to reach to phoneme templates. In this option, you can make the characters for special sounds.
Toon Boom Harmony Download Mac
Top Advantages of Toon Boom Harmony Torren
It consists of steep learning curves. There is no problem faced for the naive user.
It can run on Mac and another PC computer simply.
Toon Boom Harmony Torrent has numerous drawing and animation functions.
Why People use and Take benefit
You can share your files and handle quality from the database.
It helps to generate effectively animated shows on TV.
You can create simp sons, bob’s burger, sponge bob, rick, and more.
Toon Boom Harmony 10 Download
What’s New Updates?
Toon Boom Harmony Download Pc
The latest released version of toon boom harmony is 16.0
It has the interpolation for the master controller, to produce a 2D.
New several layer write code can export several documents.
It also contains a refresh script file to refresh the items.
How to Cracked Full Version?
Download Toon Boom Harmony Torrent file free
Unzip it first of all and open in free folder
Install this in a private location
After that run Cracked file
Press to Patched this software
Wait for the activation process
Finally, this software full version is activated
King's quest 7 download mac. You Can Also Download: Unity 2019 Crack: Autodesk AutoCAD 2020 Crack:
0 notes
Text
Security Solutions for PHP
PHP is as secure a language as any other programming language. It’s an open source server side scripting language that has various attributes and frameworks which requires programmers to write and engineer secure applications.
In PHP there are several areas where security issues appear more frequently. Malicious users can exploit these vulnerabilities to gain sensitive information about your system or your users.
These vulnerabilities can include:
Injection
Broken Authentication
Sensitive Data Exposure
Broken Access control
Cross Site Scripting (XSS)
Insecure Deserialization
PHP also relies on several third-party libraries which can have security vulnerabilities. If the application is using the vulnerable library version, then the application also may be vulnerable too.
Injection
A code injection happens when an attacker sends invalid data to the web application with the intention to make it do something that the application was not designed/programmed to do.
Perhaps the most common example around this security vulnerability is the SQL query consuming untrusted data. You can see one example below:
String query = “SELECT * FROM accounts WHERE custID = ‘” + request.getParameter(“id”) + “‘”;
This query can be made use of by calling up the web page executing it with the following URL: http://example.com/app/accountView?id=’ or ‘1’=’1 causing the return of all the rows stored on the database table.
The core of a code injection is the lack of validation of the data used by the web applications which means that this weakness can be present on almost any type of technology.
Following are the recommendations to prevent SQL injections
Use positive or “whitelist” server-side input validation.
For any residual dynamic queries, escape special characters using the specific escape syntax for that interpreter.
Use LIMIT and other SQL controls within queries to prevent mass disclosure of records in case of SQL injection.
Broken Authentication
A broken authentication can allow an attacker to use manual and/or automatic methods to try to gain control over any account they want in a system — or even worse — to gain complete control over the system. These threats can come in many forms. A web application contains a broken authentication threats if it:
Permits automated threats such as credential stuffing, where the hacker has a list of valid usernames and passwords.
Permits brute force or other automated threats.
Permits default, weak, or well-known common passwords.
Uses common text, encrypted, or weakly hashed passwords.
Has missing or ineffective multi-factor authentication.
Shown session IDs in the URL (e.g., URL rewriting).
Following are the recommended preventive measures.
Where the other possible way is the implementation of multi-factor authentication to prevent automated, credential stuffing, brute force, and stolen credential reuse threats.
Do not ship or make use of any default credentials, particularly for admin users.
Implement weak-password checks
Use a server-side, secure, built-in session manager that generates a new random session ID with high entropy after login. Session IDs should not be in the URL. Ids should also be securely stored and invalidated after logout, idle, and absolute timeouts.
Sensitive Data Exposure
Over the last few years, sensitive data exposure has been one of the most common threat around the world. Some sensitive data that needs protection is Credentials, Credit card numbers, Social Security Numbers, Medical information, Personally, identifiable information (PII), Other personal information. This threat is usually very hard to make use of; however, the consequences of a successful attack are dreadful.
There are two types of data:
Stored data — data at rest
Transmitted data — data that is transmitted internally between servers, or to web browsers
Both types of data should be protected. When thinking about data in transit, one way to protect it on a website is by having an SSL certificate. Not encrypting sensitive data is the main reason why these attacks are still so widespread.
Some of the ways to prevent data exposure are:
Do not store sensitive data unnecessarily.
Discard it as soon as possible or use PCI DSS compliant tokenization or even shorten. Data that is not retained cannot be stolen.
Make sure to encrypt all possible sensitive data at rest.
Ensure up-to-date and strong standardized algorithms, protocols, and keys are in place; use proper key management.
Disable caching for responses that contain sensitive data.
Store passwords using strong adaptive and salted hashing functions with a work factor (delay factor), such as bcrypt
Broken Access Control
Access controls are mainly designed to prevent users from acting outside their intended permissions, when threats exist in these controls, or there are no controls users can act outside of their intended permissions. This may help attackers to steal information from other users, modify data and perform actions as other users. Broken access controls can make applications at a high-risk for compromise, typically resulting in the impact of confidentiality and integrity of data. An adversary can steal information accessed by users of the application, exploit data by performing actions that various user roles can perform within the application, and in certain circumstances compromise the web server.
Common access control vulnerabilities include:
Bypassing access control ensure by modifying the URL, internal application state, or the HTML page, or simply using a custom API attack tool
providing the primary key to be changed to another’s users record, permitting viewing or editing someone else’s account.
upgrading of privilege.
Metadata exploitation, such as replaying or tampering with a JSON Web Token (JWT) access control token or a cookie or hidden field exploited to elevate privileges, or abusing JWT invalidation
CORS misconfiguration allows unauthorized API access.
Force browsing to authenticated pages as an unauthenticated user or to advanced pages as a standard user. Entering API with missing access controls for POST, PUT and DELETE.
The technical recommendations to prevent broken access control are:
Except for public resources, deny by default.
Executing access control mechanisms once and reuse them throughout the application, including minimizing CORS usage.
Model access controls should enforce record ownership instead of accepting that the user can create, read, update, or delete any record.
Defuse web server directory listing and ensure file metadata (e.g. git) and backup files even if they are not present within web roots.
Maintain log access control failures, alert admins when appropriate (e.g. repeated failures).
Developers and QA staff should include functional access control units and integration tests.
Cross-Site Scripting (XSS)
Cross-Site Scripting (XSS) is the most used common singular security threat existing in web applications at large. XSS occurs when an attacker can inject a script, often JavaScript, into the output of a web application in such a way that it is executed in the client browser. This ordinarily happens by locating a means of breaking out of a data context in HTML into a scripting context — usually by injecting new HTML, JavaScript strings or CSS markup. HTML has no shortage of locations in which executable JavaScript can be injected and browsers have even managed to add more. The injection is sent to the web application via any means of input such as HTTP parameters.
Injected JavaScript can be used to accomplish quite a lot: stealing cookie and session information, performing HTTP requests with the user’s session, redirecting users to hostile websites, accessing and manipulating client-side persistent storage, performing complex calculations and returning results to an attacker’s server, attacking the browser or installing malware, leveraging control of the user interface via the DOM to perform a UI Redress (aka Clickjacking) attack, rewriting or manipulating in-browser applications, attacking browser extensions, and the list goes on…possibly forever.
Some preventive measures to reduce the chances of XSS attacks:
Using the frameworks that automatically escape XSS by design.
Escaping untrusted HTTP request data based on the context in the HTML output will resolve Reflected and Stored XSS vulnerabilities.
Put in context-sensitive encoding when modifying the browser document on the client side acts against DOM XSS.
Allowing a content security policy (CSP) is a defense-in-depth mitigating control against XSS.
Insecure Deserialization
There should be a way to transform the in-memory object into a stream of bytes which can be easily stored and shared. That is what the process of serialization is all about. When the game performs the serialization of an object, we say that the object is serialized.

The following function in php to perform the mutation of object to bytes is as follows:
$my_object = serialize($variable);
Deserialization is the opposite of serialization. In fact, it consists of converting the serialized data into an in-memory representation which the software can then manipulate. If we want to retrieve the state of the serialized character object, it needs to deserialize it first.

The following function in php to perform the mutation from bytes to object is as follows:
$my_bytes = unserialize($variable);
When a software deserializes user-maintained data without verification, we call it insecure deserialization. If the developer does not perform a verification before deserialization, the insecure deserialization will trigger the attacker’s code.
The best way to protect your web application from this type of risk is not to accept serialized objects from untrusted sources.
Following are some recommendations that you can try to implement:
Performing integrity checks such as digital signatures on any serialized objects to prevent hostile object creation or data tampering.
Impose strict type constraints during deserialization before object creation as the code typically expects a definable set of classes.
Separating and running code that deserializes in low privilege environments when possible.
Logging exceptions and failures, such as where the incoming type is not the expected type, or the deserialization throws exceptions.
Limiting or monitoring incoming and outgoing network connectivity from containers or servers that deserialize.
Monitoring deserialization, alerting if a user deserializes constantly.
Conclusion
Security vulnerabilities are a fact of life. While a security breach can be damaging to your business, there are plenty of ways you can protect your PHP sites and mitigate your risk that don’t require you to be a security genius with the right training, awareness, tools, and practices, you can safely run PHP applications today and in future .

For more information on the topic go to PHP.
0 notes
Text
Use Azure Resource Groups: A Simple Explanation
Resource groups (RG) in Azure is a new approach to group a collection of assets in logical groups for easy or even automatic provisioning, monitoring, and access control, and for more effective management of their costs. One benefit of using RGs in Azure is grouping related resources that belong to an application together, as they share a unified lifecycle from creation to usage and finally, de-provisioning.
The underlying technology that powers resource groups is the Azure Resource Manager (ARM). ARM was built by Microsoft in response to the shortcomings of the old Azure Service Manager (ASM) technology that powered the old Azure management portal. With ASM, users could create resources in an unstructured manner, leading to many challenges in tracking such resources or understanding their dependencies. This led to huge difficulties that discouraged people from using Azure, as they would have a big mess once they had to deal with multiple applications that spanned more than one region.
To better understand this challenge, imagine you wanted to create an application in the old Azure management portal. To do so, you would create the virtual networks, the storage account(s), the cloud services, virtual machines, and potentially many other components of that application—without the ability to group them. If you were to build or deploy more than one application, it would become a difficult to find which resources depended on which, what order to create them by, or even which application they belonged to.
How Do Azure Resource Groups Help?
Azure Resource Manager, which was announced in 2014 and became generally available in 2017, addresses this challenge and others by providing a new set of application programming interfaces (APIs) that are used to provision resources in Azure. ARM requires that resources be placed in resource groups, which allows for logical grouping of related resources.
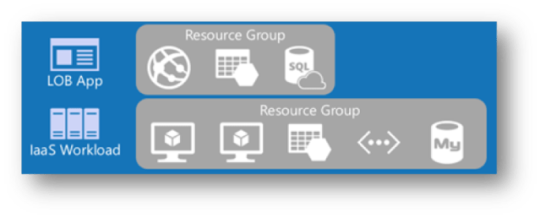
Line-of-Business in Azure (LOB)
In the figure below, two resource groups are used for grouping: First, those that are related to a line-of-business (LOB) application, and second, to an infrastructure as a service (IaaS) workload.
Although creating a resource group requires specifying a region for it to be stored in, the resources in that resource group could span multiple regions. The requirement to have a region for a resource group comes from the need to store the deployment metadata (definitions) associated with it in a specific location and does not dictate that resources belonging to it need to be in the same region.
Benefits of Azure Resource Manager (ARM)
Before ARM, you had to provision resources independently and you had to have a good understanding of their dependencies and accommodate for them in deployment scripts. As an example, to create a virtual machine, you needed to create a storage account, a virtual network, a subnet, etc. first.
On the other hand, ARM can figure out the dependencies of resources that need to be provisioned before creating the virtual machine and what order they need to be provisioned in, saving the user from having to repeat their work to fix unnecessary errors during deployment. In the example above, ARM will automatically create the virtual network and storage account simultaneously with the virtual machine. The portal blades walk the user through defining the related resources as part of provisioning the virtual network. As an example, in the screenshot below, you can see that creating a virtual machine requires specifying the other dependencies in the settings blade, including the virtual network, the subnet, the public IP address, and storage account, among other things.

Settings a Resource Group in Azure
ARM provides the ability to provision resources declaratively using JavaScript Object Notation (JSON) documents. The JSON document may include a description of multiple resources that need to be provisioned in a resource group, and ARM knows how to provision them accordingly. This provides an added flexibility and ease in managing resources belonging to resource groups. Using JSON in this manner allowed for creating resource templates that would make it much faster to provision resources belonging to a resource group. This also allowed for third party providers to make hundreds of templates available to provision different resources that correspond to many deployment scenarios. Those templates are available from code repositories such as GitHub or the Azure Marketplace.
In the ARM architecture, resource groups not only become units of deployment, but also units of management of related resources. This allows users to determine the cost associated with the whole resource group, making accounting and chargebacks more manageable. It also allows role-based access control (RBAC) at the resource group level, making it much easier to manage user access to the resources in the group. When users log into the Azure Portal, they will only see resource groups they have access to and not others within the subscription. Administrators will still be able to assign access control for users to individual resources within the resource group based on their roles.
Management of Azure Resource Group
Aside from scripting (e.g. using PowerShell or the Azure CLI 2.0,) resource groups can only be managed in the new Azure portal that became generally available last year. If using the new Azure Portal, a resource group item is available in the navigation menu by default and can be used to open the RG management “blade,” as you can see in the screenshot below.
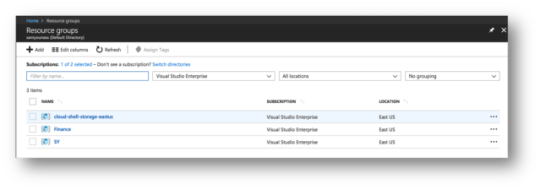
List of Resource Group in Azure
The RG management blade provides a straightforward way to create and manage resource groups. It also provides a flexible customizable, high-level view of available resource groups in a specific Azure subscription. The user can select what columns to see in this view based on their role and interests and may use filters to zoom in on resource groups specific to a subscription or a location.

Resources in a Resource Group
The new portal was designed to work well with the ARM concepts and architecture providing great flexibility and user experience in how resources are displayed and managed. The portal displays blades to the user as additional resources are created. A blade is a self-contained page (or set of pages) that allows the user to view and manage all aspects of the resource they have created using a step-by-step wizard-like approach for building the resource.
Keys to a Successful Azure Resource Groups
Despite the advantages resource groups and ARM bring to Azure users, it is important to use them with care and good insight. The key to having a successful design of resource groups is understanding the lifecycle of the resources that are included in them. For instance, if an application requires different resources that need to be updated together, such as having a SQL database, a web app, a mobile app, etc., then it makes sense to group these resource in the same resource group. It is important, however, to use different resource groups for dev/test, staging, or production, as the resources in these groups have different lifecycles.
The post Use Azure Resource Groups: A Simple Explanation appeared first on PureSourceCode.
from WordPress https://www.puresourcecode.com/tools/use-azure-resource-groups-a-simple-explanation/
0 notes
Photo

A Beginner’s Guide to Feathers.js
In this article, you’ll learn how to build a RESTful API Server in Node.js using Feathers.
An API server, also known as an Application Server, is a program that provides data to front-end applications. It also handles business logic in the back end and provides restricted access to an organization's database. It doesn't just prevent unauthorized persons from accessing the data; it can also restrict logged-in users from accessing or altering data if they don't have permission to do so.
Every application you build will need to provide a service to its end users. For that, your application will need data to process. You can use remote APIs to create a new service. For most applications, though, you’ll need to manage your own data store. A popular option is to use online data storage services such as Firebase. This way, you don't have to deal with the nitty gritty details of running a distributed database server. However, your project needs may require the use of a full-fledged, in-house database management system such as MongoDB or Oracle. For your front-end application to access the data stored in the database, you’ll need a server application that sits between the database and the front-end application.
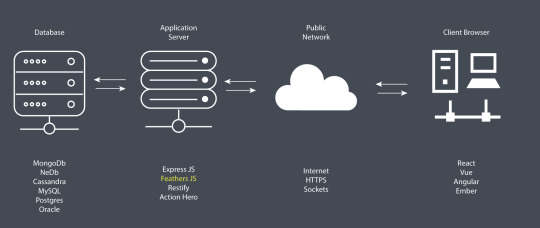
As illustrated in the diagram above, the work of an application server is to access data from a database using SQL or NoSQL commands and convert into a format that front-end applications (client browser) can understand — such as JSON. In addition, the application server can use various security protocols — such as HTTPS encryption and token authorization — to ensure that communication between the database and the client application is safe and secure. One main advantage of using such an architecture is that you can deploy applications that target different platforms — desktop, mobile, web, and so on — using the same application server. It’s also very easy to scale your application horizontally in order to serve more users efficiently with fast response times.
We’re going to build a simple API server and demonstrate the various features that Feathers provides.
Prerequisites
Before you begin following this tutorial, you’ll need to have a good foundation in the following topics:
ES6 JavaScript
creating Express apps
creating RESTful APIs with Express
Feathers is built on top of Express, a minimalist web framework for Node.js. If you’ve completed the tutorials demonstrated in the links, you’ll realize that it's quite tiring building RESTful APIs using just Express. With Feathers, most of the repetitive work is already done for you. You only need to focus on configuring and customizing code. Let's dive into the code and learn how this web framework works.
Project Creation
To get started with Feathers, you’ll need to install its command line application globally:
npm install -g @feathersjs/cli
Next, create a new API project using the commands below:
mkdir contacts-api cd contacts-api feathers generate app
Below are the options I chose. Feel free to choose any testing framework. Unfortunately, testing is beyond the focus of this article, so it won't be covered here. Personally, I like simplicity, and that’s why I went with Jest.

Once the installation is complete, you can open you favorite code editor to look at the project files.
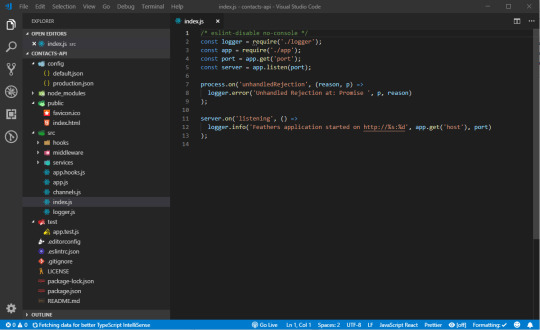
If you’ve completed the Express tutorials I listed in the prerequisites section, you shouldn't be intimidated by the generated code. Here's a brief summary that describes the folders and files.

Don't be too concerned with what each file does right now. You’ll come to understand how they work in the course in this tutorial. For now, let's confirm that the tests are working.
Linting
To ensure our project is compliant with the defined ESLint rules, just run the command npm test. If you’re on a Unix or Linux platform, this should run fine. If you’re on Windows, there are few things you need to adjust for the tests to run successfully.
First, go to package.json and look at the scripts section. Change the test line to this:
"scripts": { "test": "npm run eslint && SET NODE_ENV= npm run jest", },
Next, if you’ve installed Prettier in Visual Studio Code, you'll need to change the single quote setting to true in the Workspace settings tab:
{ "prettier.singleQuote": true }
Finally, make sure that, when you create or edit any file, the line ending is LF. If you’re using Visual Studio Code or a similar editor, you can check the current line ending style at the status bar. If it says CRLF, change to LF. Making those changes will help you pass the lint tests. Unfortunately, to make the tests pass will require a bit more work, which won't be covered here.
Let's look at how we can generate a CRUD RESTful interface.
Generate Service
Building a Restful CRUD API interface in Express requires a bit of work. In Feathers, all you have to do is execute a single command, answer a few questions and have the code generated for you:
$ feathers generate service ? What kind of service is it? NeDB ? What is the name of the service? contacts ? Which path should the service be registered on? /contacts ? What is the database connection string? nedb://../data force config\default.json create src\services\contacts\contacts.service.js force src\services\index.js create src\models\contacts.model.js create src\services\contacts\contacts.hooks.js create test\services\contacts.test.js
We’ll be using NeDB database for this tutorial. Feathers does support both SQL databases such as MySQL and NoSQL databases such as MongoDB. However, installing a database system — whether on your machine or on a cloud server — requires a certain amount of time configuring it. NeDB, on the other hand, is an in-memory database that’s 100% JavaScript and supports a subset of MongoDB API. There’s no configuration needed; you just install it. It's a great database for prototyping and testing new applications. This is what we’ll use in this tutorial.
Let's briefly look at some of the files that have been generated using this command:
services/contacts/contact.service.js. This is a Feathers service that provides the CRUD API endpoints for /contacts. Pretty small, isn't it? This is because Feathers does the heavy lifting for us. It saves us from writing boilerplate CRUD code.
services/contacts/contact.hooks.js. This is where we customize how the CRUD logic behaves. We have the before section, where we can check or change data before Feathers reads or writes to the database. We also have an after section, where we can check or change the results from the database before it’s sent to the client application. We can do things like restricting access, data validation, performing join operations and calculating values for additional fields or columns.
models/contacts.model.js. This where we define a model and attach it to a database table. This is also where we define a schema which can be used to validate fields when a new record is inserted or updated. Unfortunately, NeDB doesn’t support schemas. However, I've provided an example of a model that’s connected to MongoDB, which supports the schema feature via the mongoose adapter:
"use strict"; const mongoose = require("mongoose"); const Schema = mongoose.Schema; require("mongoose-type-email"); const contactsSchema = new Schema({ name: { first: { type: String, required: [true, "First Name is required"] }, last: { type: String, required: false } }, email: { type: mongoose.SchemaTypes.Email, required: [true, "Email is required"] }, phone: { type: String, required: [true, "Phone is required"], validate: { validator: function(v) { return /^\+(?:[0-9] ?){6,14}[0-9]$/.test(v); }, message: "{VALUE} is not a valid international phone number!" } }, createdAt: { type: Date, default: Date.now }, updatedAt: { type: Date, default: Date.now } }); const contactsModel = mongoose.model("contacts", contactsSchema); module.exports = contactsModel;
Despite the limitations of using NeDB, it’s still a great database for prototyping. Most NoSQL databases will allow you to submit data using any structure without having to define a schema first. It’s wiser to implement a schema once the project requirements have been realized. With a schema in place, Feathers will perform field validation for you using the rules you’ve defined. You'll need a production-ready database such as MongoDB to be able to define a schema. Do note the configuration for the development database is defined at config/default.json:
"nedb": "../data"
This is where database credentials are provided. We also have another config file called config/production.json. This is the production database configuration that’s used when you deploy your Feathers app. It's important to use a separate database during development. Otherwise, you run the risk of deleting or corrupting business operational data on the production database.
Now that we have our CRUD service for contacts set up, it's time to take it for a spin. You can start the Feather server using the command npm start. Do note that this server doesn’t support hot reloading. So you'll need to restart it every time you make a change to the code. In order to interact with our Feathers app, we’ll need an API browser tool such as Postman or Insomnia. I'll be using Insomnia in this tutorial, but you can follow along easily with Postman or any other tool.
Create a new GET request (press Ctrl + N) and give it the title “List Contacts”. In the URL section, enter http://localhost:3030/contacts. When you hit the Send button, you should have the following view:

Nothing! Our database is currently empty, so we need to create some new contacts. Create a new request called Create Contact. Fill in the rest of the fields as shown below:
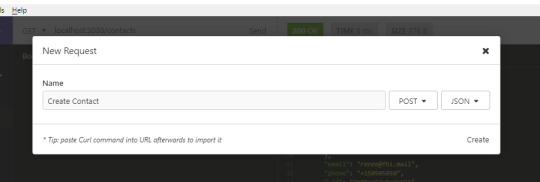
In case you forgot to change the METHOD to POST in the above form, you can do so later. Change the method to POST and change the Body tab to JSON. Copy the following data in the JSON tab:
{ "name": { "first": "Jack", "last": "Bauer" }, "email": "[email protected]", "phone": "+1234567" }
When you hit the Send button, you should get the following response. Notice that an _id has been generated for your new contact.
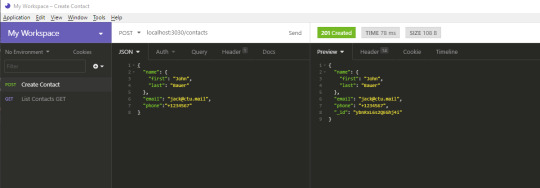
Go back to List Contacts and hit the Send button again. You should get the following result:
{ "total": 1, "limit": 10, "skip": 0, "data": [ { "name": { "first": "Jack", "last": "Bauer" }, "email": "[email protected]", "phone": "+1234567", "_id": "ybnRxL6s2QEGhj4i" } ] }
Go back to Create Contact and post a couple of new records:
{ "name": { "first": "Chloe", "last": "O'Brian" }, "email": "[email protected]", "phone": "+1987654" }
{ "name": { "first": "Renee", "last": "Walker" }, "email": "[email protected]", "phone": "+150505050" }
Let's now perform an update. For this, we won't use the UPDATE HTTP method. This method will completely overwrite a record. What we want to do is just overwrite a single field, not the the whole record. For that, we’ll use PATCH. Create a new request, Update Contact as illustrated below:
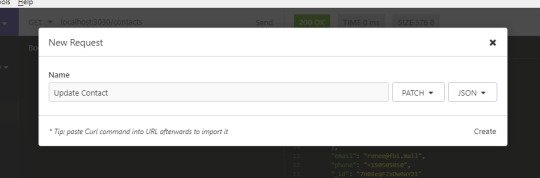
In the URL field, put http://localhost:3030/contacts/{_id}. Replace {_id} with the ID of the first record. Place the following data into the JSON tab:
{ "email": "[email protected]" }
Hit the Send button. You should get the following result:
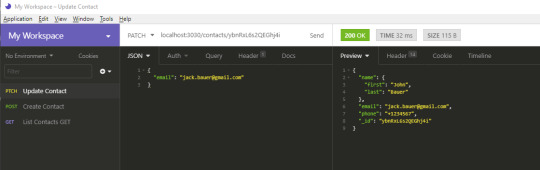
Notice how the the rest of the fields remain intact. Next, we’re going to delete a record. This one is easy. Just create a new DELETE request and name it Delete Contact. In the URL field, use the format http://localhost:3030/contacts/{_id}. Just like before, replace {_id} with the ID of the record you want to delete. Hitting Send will delete that record for you. You can confirm by running the List Contact request again.
We've just verified that all CRUD operations are running okay. In the next section, we’ll learn how to set up authentication.
The post A Beginner’s Guide to Feathers.js appeared first on SitePoint.
by Michael Wanyoike via SitePoint https://ift.tt/2OjpNpu
0 notes
Text
Microsoft Azure Consultant
Job Title : Microsoft Azure Consultant Location : Nashville, TN Duration : Contract Note: ?US Citizens and those authorized to work in the US are encouraged to apply. We are unable to sponsor H1b visa?s at this time" Job Description: 1. To operationally support Infrastructure as Code for IAAS Windows & Linux, with Azure 2. To work / collaborate with UBS Azure engineering to deliver CI/CD pipelines for build artefacts using Azure DEVOPS for Production 3. To support a full Azure DEVOPS pipeline approach with tools, orchestration and deployment 4. To provide feedback to engineering on automated solutions around fabric management, subscription architecture and role based access in azure 5. Adopt / embrace / work with Azure cloud services (IaaS, PaaS / SaaS) 6. Communicate & support colleagues in embracing Azure as the future cloud platform for UBS. 7. Develop / enhance management interfaces using native tooling and languages (i.e. for log analytics etc.) 8. Exceptional knowledge in Azure portal administration 9. Migration knowledge either from on-prem to a cloud provider or from cloud to cloud, with a view to become a subject matter expert 10. Broad knowledge of Cloud (SaaS, IaaS and PaaS) solutions is a plus; extensive partner/vendor management experience is also welcomed. 11. Good knowledge of operationally supporting large scale Azure cloud projects and programs 12. Work in a team that will collaborate with stakeholders, engineering functions and the Cloud Business Office 13. Development skills for use with creation/enhancement of Policies, Queries, ARM templates, JSON, programming languages to interface with various API's and miscellaneous scripting languages e.g. Python and PowerShell 14. Administer Azure Active Directory 15. Conditional Access including RBAC models etc. 16. Multifactor Authentication 17. Active Directory management & replication and connections with private AD 18. User account administration 19. Group administration 20. System Monitoring & Management 21. Policy creation / enhancement 22. Compliance automation 23. Programming languages, used with ARM templates, JSON, API integration, query and scripting languages and general IaC code enhancement 24. Investigate and report on all alerts 25. Incident Management 26. Release Management 27. Configuration Management 28. Availability Management 29. Patch & Update Management 30. Monitor and respond to critical emails/issues off hours 31. Azure core services including networking, Storage, Policies, Azure DevOps, Database, Middleware, servers etc. at a best practices level (in-depth support in items like SQL etc. is not essential) 32. Skills standardization, automation general platform management across Azure services Reference : Microsoft Azure Consultant jobs Source: http://jobrealtime.com/jobs/technology/microsoft-azure-consultant_i3212
0 notes
Text
Xavier - PHP Login Script & User Management Admin Panel
New Post has been published on https://intramate.com/php-scripts/xavier-php-login-script-user-management-admin-panel/
Xavier - PHP Login Script & User Management Admin Panel
LIVE PREVIEWGet it now for only $20
The Xavier PHP Login script is a User Management Login Script with a backend Admin Panel allowing you to easily protect web pages or content within web pages by dropping a couple of lines of code at the top of your pages.
The script can easily be dropped in to an existing website allowing you to protect pages by adding one line of PHP code at the top of a page. You can also protect sections of pages. Secure your web pages or sections of content dependant on whether your users are logged in or out, or whether they are a member of a User Group. Or secure your pages dependent on whether you are logged on as an administrator. The example pages and scripts (login, registration, forgotten password, etc.) included in the script can be customised to be used in your own website or can fit neatly in to your existing website.
Hybrid App? No problem. With our script, and a bit of tweaking with a PHP API and JSON, you can easily have your visitors authenticated to your hybrid mobile app. We have examples and a demo waiting. Just purchase the script and then contact us.
The administration panel allows you to administer your users and change various site settings. As an admin you can add, edit, ban or delete users or user groups. It is built on Bootstrap and is highly customizable.
Main Features
Can be dropped in to an existing website or used ‘out of the box’.
Protect your site’s pages or sections of pages by login status, group status and/or group level status.
Optional Captcha (and other failsafes) to avoid registration of automated bots.
User login using PHP sessions, navigate across pages and stay logged on.
Full Logging Facility.
View individual login sessions & details. Granular information.
User Groups with optional levels.
Promote regular users to admins who will have some admin functions.
User timeout after inactivity.
Unique User Home Pages.
Users can change profile settings, change passwords, e-mail addresses.
Forgot Password feature.
Optional admin or e-mail activation.
Optional welcome e-mail.
Admin can add, activate, ban, edit or delete users.
View and display Active Users.
Records user’s registration date, last login date and IP addresses.
Records Most Ever Users Online.
Passwords are individually hashed and salted using BCRYPT.
Change minimum / maximum username or password length.
Confirm password & e-mail address on registration.
Customizable Admin Skin which uses Bootstrap CSS
Turn off/on multiple login from the same account.
Plus much much more….
Demo
Try the online demo here at the Angry Frog website. Logon as admin with username: admin / password: P4ssw0rd
Support
Support is provided by the author. Click on the support tab and e-mail us if you are having any issues with the script or you can post any general queries or observations in the comments section. There are also detailed instructions provided with the script.
Updates
v 3.2
[Changes] Added PHPMailer so that mail handling is improved. [Updated] Added PHPMailer.php and Exception.php to Admin/Includes folder [Updated] Edited/Updated Mailer.php page
v 3.1
[Fixed] Updated index.php sql query at bottom of page (around line 287) to prevent error caused when sql mode ONLY_FULL_GROUP_BY is turned on. [Fixed] Updated Functions.php page (line 301) to allow isMemberOfGroup function to work. [Fixed] Please add default value of 0 to timestamp column in user_sessions table to prevent error caused when SQL STRICT mode is turned on.
v 3.0
[Changes] Re-design of how User Sessions are handled. [Changes] Improved 'Remember Me' cookie handling - More secure [Changes] Improved User Password Reset feature - More secure [Changes] Multiple login from one account enabled - turn on/off [Updated] New tables in database - 'user_session' and 'user_temp' [Updated] Change to Users table - removed 'actkey' and 'userid' columns [Updated] Change to Configurations table - added 'ALLOW_MULTI_LOGONS' and 'PERSIST_NOT_EXPIRE' columns [Updated] Introduced Google reCaptcha [Fixed] Admin User Creation - better error handling of form fields
v 2.5
[Changes] Updated hash algorithm to BCRYPT [Updated] Multiple file changes to accomodate new password hash [Updated] Removed references to usersalt and dropped column from Users table [Updated] Changed password hashing function to password_hash and password verify functions. [Updated] Tidied up code.
v 2.4.1
[fixed] Problem not being able to change user password [Changes] Banned User is now kicked from session whilst logged on [Updated] Changed admin/login.php page to make it clearer that it is only for admin logins
v 2.4
[Changes] Allow logon with e-mail address [Changes] No longer allowed duplicate email addresses - option removed from admin panel (and database) [Changes] Admin Registration Summary page gives better error info on unsuccessful admin registration [Updated] Updated Database - removed ALLOW_DUPE_EMAIL column from configuration table
v 2.3
[Updated] - Added SHA256 hash algorithm for hashing user passwords.
v 2.2.1
[fixed] Could not change user details correctly when 'Allow Duplicate Email' is Off [Updated] admin/includes/Adminfunctions.php - Updated adminEditAccount function
v 2.2.0
Added Logging and other small fixes.
v 2.1.0
Added Unique User Home Pages - Pages users are sent to after initial login. This can be set by the admin or individually for each user.
v 2
New Release - complete update and redesign of the admin GUI with lots of improvements. Folder structure changes. No database changes.
v1.1.2
Fixed isMemberOfGroup function Change where site redirects to after login. <strong>Database update is required!);</strong> Run this SQL on your database - INSERT INTO `configuration` (`config_name`, `config_value`) VALUES ('login_page', 'index.php');
v 1.1.1
Fixed Bug - removing user from all groups.
v 1.1.0
Added User Groups. Made improvements to the banning system. Added ability to promote regular users to admin, who then have limited admin permissions. Fixed some bugs.
LIVE PREVIEWGet it now for only $20
0 notes
Link
Disclaimer: I'm not an expert in any of the things I'm writing about here. I'll do my best to answer any questions you have, but definitely don't take my word for gospel. I'm still learning and figuring things out on the fly.I've put a link to my site at the bottom of this post, let me know if I should remove it.My background:I work for a tech company, but not in the engineering department. I don't do much scripting except for the occasional batch script here and there. I've created Shopify sites for previous companies before, but I've never built a website from scratch.My goal:I wanted to create a website from scratch, writing all the HTML, CSS, and Javascript myself, avoiding the use of templates of any kind. Monetization is secondary at this point, I mainly want a real product I can point at and say "I made that." And because of the infrastructure I'm using for hosting, I can keep this website up and running at little to no cost (I'll get to this in a bit).My idea:A website that aggregates professional reviews for electronics (cell phones, tablets, laptops). Literally Rotten Tomatoes for elecronic devices. Not the most unique idea, to be honest, but I figure it would be a project to work on while I'm still learning everything. Just complicated enough to present a challenge, but not so complicated that I wouldn't be able to actually create it. And I wanted an idea that served a useful purpose to users of the site, but without me needing to worry about identity management (I currently don't allow for user reviews, maybe in the future I'll implement user profiles).The plan:I wanted the site to be completely static, allowing me to use an Amazon Web Services S3 bucket to host my site and other assets. This is why hosting this site will cost me close to nothing (yes, even after the AWS Free Tier expires in 12 months). I also planned on using DynamoDB to store my product information, with Lambda functions used to query it, and Javascript on the website itself to show dynamic content (heads up, I scrapped this part of the plan after I figured out an easier way to execute my idea).The creation of the site:I started by creating a checklist in a spreadsheet to act as a to-do list for each component I scoped out (design, frontend, backend, infrastructure, marketing). I credit this step for keeping me on track with the whole project, which has been especially important since I've been WFH for close to 2 months now, so I'm surrounded by distractions 24/7.After creating some mockups of how I imagined the layout of each webpage would look like, I opened up a text editor and just started writing some HTML to create some basic webpages. I almost immediately realized that starting truly from scratch was going to be a huge undertaking, mainly with the CSS I needed. So I decided to use Bootstrap, a CSS framework. That gave me access to a bunch of premade CSS elements to use, but I still had to properly use them in my HTML, which was (and still is) quite the challenge. Eventually I created some static webpages that looked good. So the next step was creating the backend to dynamically serve content.The frustation:I started working on the backend. This involved the storage of my product information, querying it, then presenting it on the site. I spent close to a week fumbling around with DynamoDB and Lambda, but after realizing I would have to deal with a lot of frustrating limitations (Lambda functions take longer to execute the more complicated they are and DynamoDB doesn't have an easy way to sort my dataset), I scrapped this part of my plan entirely. However, the time I spent with DynamoDB and Lambda wasn't a complete waste because I learned a lot about Javascript and JSON files, which turned out to be pretty critical to this whole project.The change of plan:I created a JSON file to act as my "database" (I know, not a real database, but my needs are relatively simple and lightweight). And instead of dynamically serving content with Javascript every time some accesses my site, I just generate completely static pages with a Javascript script running on my laptop (I should probably use Python for this, but I'm currently using Javascript because I ended up repurposing a lot of scripts that I wrote while I was still figuring out DynamoDB and Lambda). The frontpage, category pages, and product pages are all written automatically and uploaded to S3 by the script and don't require more effort from me to create, even as my "database" grows. The only thing I do now is add products to the JSON file, making sure to fill in the fields of each JSON object appropriately, then my script reads from the JSON "database" to generate webpages.The only page that still needs to use Javascript for dynamic content is the search result page. Unless someone asks, I'll avoid most of the technical details. I just want to say that I'm especially proud of what I was able to accomplish with the search function on my site. I use Lunr to access a search index and then client-side Javascript to handle the serving of results, the sorting, filtering, and pagination. I created all the code myself, so I doubt any of it is truly "production ready," but it's functional. I'm also worried about all of this being client-side, but it allows me to stick with a pure static infrastructure. If the site grows, I'll probably start server-side development.Why it's so cheap:I think the easiest way to show why it's so cheap to host my site is to list what AWS services I use and their associated costs:S3: $0.023 per GB, $0.0004 per 1,000 GET requestsI gzip all my HTML and Javascript files, so I'm currently using less than 5 MB, the majority of which is the pictures.CloudFront: $0.085 per GB transferred out to Internet, $0.0100 per 10,000 HTTPS requestsI'm only using CDNs located in the US, Canada, and Europe, so my costs are on the lowest tier.Certificate Manager: $0SSL certificates are free if it's for CloudFront, so I don't pay anything for my site's SSL certificate.Route 53: $0.50 per hosted zone/month, $0.40 per million queriesI currently use 1 hosted zone for DNS.For the next 12 months, I'll qualify for the Free Tier, which means I pay literally nothing. In fact, the only money I've spent so far is the $12 it cost for the domain name (recurring annually).The finished product:https://wozlo.comThe future:I need to add more products to the site. This part of the project has ended up being what takes up most of my free time. I have to manually curate each and every review for each product, in addition to finding details on each product manually. One of my plans for the future are to automate this somehow, but for now, I'm just happy to have something to show for all the work I've put in. Until then, I'll be spending most of my time in isolation browsing review sites and adding to my JSON "database".I also need to think of a marketing plan, but I'm not planning on spending any money on that for at least a few months. I don't think consumer spending is at a level that would justify me spending money on an advertising campaign.Thanks for taking the time to read this. Any feedback, comments, criticisms you have for my post or my website would be greatly appreciated. Take care and stay safe during this stressful time!
0 notes
Text
Build a chat app with Ruby on Rails
Not all web apps need chat, but if you want to communicate with your customers, or you want them to communicate with each other, you’re going to run into this problem quickly. CometChat Pro is a fantastic alternative to rolling your own chat service. You’ll see that you can easily insert chat into your application, without it getting in the way of other content you may be delivering.
Prerequisites
This tutorial doesn’t assume much knowledge at all. Ruby on Rails is an incredibly easy framework to get started with. If you’ve worked with other web technologies, you’ll probably find it very clear and very opinionated.
CometChat Pro itself needs to run in Javascript, so you’ll see a marriage between a Ruby-based framework and view manipulation through Javascript. There are many more complicated ways to handle this in Rails. For this tutorial, I kept everything in basic Javascript and the templating engine Rails ships with: erb. Rails enthusiasts will be able to easily translate these foundational tools into their specialized setups.
I assume you are able to run Rails applications – which means you already have Ruby and bundler installed. This application uses Ruby 2.5.3 and Rails 5.2.2 but nothing happening here is special for latest versions – you could plug these tools into any modern version of Rails.
Introduction
One of the hardest parts of building chat is dealing with concurrency – users need to see new messages without refreshing their browsers. CometChat Pro achieves this with very little code, as you will see.
CometChat Pro example running in two windows.
If you’ve ever tried to use Action Cable to achieve similar results, you will be very pleased with how quickly you can copy-paste your way to real-time updates in the browser.
You can jump right into the code on Github, or take this guy for a spin yourself. Let’s get it!
Setting up
Initialization
Grab yourself a terminal and fire up a new Rails app: rails new cometchatpro --skip-active-record -T. We don’t need a database for this, and the -T prevents Rails from creating test files for us. If you’ve already got an application, you can skip this step – it should be easy to pop this code into an existing project.
Environmental variables and CometChat credentails
Next, you’re going to need an API key and an App ID from CometChat Pro. Once you’ve logged in, head to the dashboard, create a new app, then generate an API key. You’ll need fullAccess, not just authOnly. Grab those credentials and add them to your .env file. You’ll need your file to look something like this:
COMETCHAT_APP_ID=23n2f2n3p2y3 COMETCHAT_API_KEY=av22g24ll
Next, add dotenv-rails to your Gemfile and bundle. Now your application can read your environmental variables. These are private credentials for your CometChat Pro account; do not commit this file to your version control!
Chat pages
Next we’ll add some boilerplate Rails views and routing so we can chat as a user with other users. Generate a new controller: rails generate controller Users. This will create a number of files, which we’ll get into shortly. You’ll also need to add a route to your new view in config/routes.rb. Here’s what my routes.rb looks like:
Rails.application.routes.draw do resources :users, only: %i[index show] root 'users#index' end
If you jump into the GitHub code or pop over to the hosted app, you’ll see that I have added user creation. I’ve left it in place because I already built it, but CometChat Pro comes with sample users baked into every account, so you can start testing right away without needing to set up user creation first. I’ve omitted discussion of user creation for this tutorial in the sake of brevity, but you can see the code needed for that in the Github repo.
You’ll also need to create a /views/users/show.html.erb file. We’ll fill it will content in a moment.
CometChat Service
Let’s get into the meat of our application – interacting with the CometChat API. I organized interactions with CometChat Pro into a service. Here’s what it looks like:
class CometChatService include HTTParty BASE_URI = 'https://api.cometchat.com/v1'.freeze def fetch_users response = HTTParty.get("#{BASE_URI}/users", headers: headers) response.dig('data') &.map { |user| {name: user['name'], id: user['uid']} } end private def headers { apikey: ENV['COMETCHAT_API_KEY'], appid: ENV['COMETCHAT_APP_ID'] } end end
CometChat Pro does a lot of things, and as we grow our app, we might want to fill this service with further interactions with their API. Here, all we need to do is fetch a list of users we can chat with. Note that no gem is needed to interact with CCP, you simply send your requests however you like (I used HTTParty) with the proper headers (from our .env file) and CCP sends back the information you requested.
I map the JSON response from CCP into the information my application needs – the user name and the user ID.
Working with the service in the users controller
Now that we have a protocol established for speaking with the CCP API, we can use it in our UsersController. Here’s what mine looks like:
class UsersController < ApplicationController def index @users = CometChatService.new.fetch_users end def show users = CometChatService.new.fetch_users @current_user = users.find { |user| user[:id] == params[:id] } @users = users.reject { |user| user[:id] == @user[:id] } end end
I’ve skipped over the index page for brevity, but it’s just a list of users who we may “chat as”. You can think of it as the most insecure, ridiculous login page imaginable. On both views, we fetch the users registered with our CometChat Pro app. We’ve already mapped the JSON response in the service, so on the index and show pages we loop through users to display them. On the show page, we are chatting “as” a user, so we don’t want him to show up in the list of possible people to chat with (line 9).
List of users in a CometChat Pro app
The user show view
Let’s walk through the sections of our user show page in turn. In a minute, we’ll discuss the Javascript necessary to make them run. I’ve also omitted discussion of styling. You can see full code for styling in the GitHub repo, or of course you could implement your own (surely much-better) styling.
Who is talking?
To make information about our “logged-in” user (the one whose show page we are on) available to the CometChat service, we’ll want to include an invisible div with the user name and id. You can put this anywhere on your page:
The user list
To display the list of users as shown above, here’s the erb code:
<ul class="list-group list-group-flush"> <% @users.each do |user| %> <li class="list-group-item user-select bg-light" id="<%= user[:id] %>" name='user-select'> <div class="d-flex w-100 justify-content-between"> <h5 class="mb-1"><%= user[:name] %></h5> </div> </li> <% end %> </ul>
There’s nothing special happening here – the only thing to note is that we are setting the user id as an id on the list-item. We’ll need it later to reference which user we are speaking to. Remember that our @users has come from the controller, where we gathered the list of users from the CometChat service.
Receiving and displaying messages
Next, let’s look at how we will display incoming messages. Our code starts as this:
<div id="messages" class="messages"> Messages loading... </div>
We need to supply a div for CometChat Pro to load messages into. I’ve called mine messages but you could call yours anything you like.
Sending messages
We’ll use Ruby’s form helpers to create our message form, but we don’t let Ruby handle any of the functionality here:
<%= form_for :message, remote: true do |f| %> <div class="col-xs-9"> Message : <%= f.text_area :text, class: "form-control" %><br/> </div> <div class="col-xs-3 capitalize"> <%= button_tag "Send Message", type: 'button', onclick: "javascript:sendMessage()", class: "btn btn-info btn-block" %> </div> <% end %>
When we click the “Send Message” button, we’ll be using Javascript to work our magic. The Rails form will just sit there, happily waiting for more input.
The heart of our application: Javascript methods
The CometChat Pro service runs on Javascript and we’ll be using their clear sample code to make the pieces of our app work.
We’ll need to take the following steps:
1. Initialization – set up a connection to the CometChat service.
2. Log in a current user.
3. Select a user to chat with and fetch message history with that person.
4. Add an event listener to pick up new messages from the other person.
5. Set up an action to send messages.
Initialization
First, we’ll need to get our app talking to the CometChat Pro service and log in. In application.html.erb, add this line between the <head> tags:
<script type="text/javascript" src="https://unpkg.com/@cometchat-pro/chat/CometChat.js"></script>
Add these lines to the bottom of /views/users/show.html.erb:
<% javascript_include_tag 'show', cache: 'myfiles' %> <script type="text/javascript"> setUserListeners(); document.addEventListener('turbolinks:load', initializeChat); </script>
We’ll look at the setUserListeners method in a second. Finally, we’re referencing a show.js.erb, which we’ll need to create and add to app/assets/javascripts.
Here’s our first Javascript method:
const initializeChat = () => { CometChat.init('').then( hasInitialized => { loginUser() }, error => { console.log("Initialization failed with error:", error); } )};
Because we loaded the CometChat Pro Javascript in our application.html.erb, we can now use CometChatmethods in our Javascript file. The first one we’ll use is .init, which requires us to send in our APP ID as a credential. We’re calling the loginUser method once our chat is initialized.
User login
After initialization, we need to log in the current user. This application includes no security whatsoever – anyone can chat as anyone else. Obviously you’d want to have something just a tiny bit more customized in a production app. Here’s how we log in our user on CometChat Pro:
const loginUser = () => { const userDiv = document.getElementById('user-id'); if (!userDiv) { return true } const id = userDiv.dataset.id; CometChat.login(id, '').then( User => { const messageDiv = document.getElementById('messages'); messageDiv.innerHTML = `<div class="whisper">Choose a user to start chatting</div>`; }, error => { console.log("Login failed with exception:", {error}); }) }
Remember that weird tag('div') that held our user information from show.html.erb? Here we use it to find out what user needs to log in. If something has gone wrong with that div, we just bail from this operation.
Next, we call our next CometChat method: .login. We take the id we got from the user div, and use our API credentials. If CometChat Pro sends back a User, we update the message div to say “Choose a user to start chatting”.
setUserListeners
Let’s hop back to the show.html.erb page where we called setUserListeners() at the bottom of the view. In order to know who we want to chat with, we’ll need to listen for clicks on the user list. Here’s what that code looks like:
const setUserListeners = () => { const userDivs = document.getElementsByName('user-select'); userDivs.forEach(user => user.addEventListener("click", e => { const id = e.target.id || e.target.offsetParent.id setUser(id); fetchMessages(id); })) }
userDivs is a node list of divs, one for each of the users we can chat with. We loop through them and add event listeners on each. If we click on a user, we want to first call setUser to tell our application who we want to talk to, and then fetchMessages for that user.
setUser and addMessageListener
Here’s where we really get some magic and CometChat Pro takes care of the heavy lifting for us. Once we log our user in and select someone to chat with, we want to see any new messages from that person in real time. With CometChat Pro, we don’t have to worry about keeping any websockets open or dealing with refreshing – the messages just appear as you would expect.
The setUser function is only concerned with making the active user blue in the list, so I’ve skipped it here. But it also calls the addMessageListener class, which is critical for receiving new messages as they come in:
const addMessageListener = id => { CometChat.addMessageListener( 'listener_id', new CometChat.MessageListener({ onTextMessageReceived: textMessage => displayNewMessage(id, textMessage) }) )}
This is taken almost directly from the CometChat Pro documentation. We call the CometChat addMessageListener method, then using incoming messages to update our message div. Fire up two different browsers to see this in action (or just check out the gif above).
displayNewMessage
When that new message comes in, we’ll need to update our view. Here’s the code:
const displayNewMessage = (currentChatterId, msg) => { const userDiv = document.getElementById('user-id'); const id = userDiv.dataset.id; if (![currentChatterId, id].includes(msg.sender.uid)) { return; } const newNode = document.createElement("div") newNode.innerHTML = newMessage(msg, id) const messageDiv = document.getElementById('messages') messageDiv.appendChild(newNode) messageDiv.scrollTop = messageDiv.scrollHeight }
First, if the incoming message isn’t between our logged-in user and the user we’re chatting with, we ignore it. Then, we need to process the new message – we construct a new div with the message, then we append it to the messages div, again scrolling to the bottom so we can see it.
newMessage
Our newMessage method will simply format the message – it’s a new bubble in our chat app. We check if the sender has the same id as the logged-in user so we can apply the self class to the div – making it pink for “self” and blue for everybody else.
const newMessage = (msg, id) => { return ( `<div class='message ${msg.sender.uid === id && 'self'}'> <div class='message-text'>${msg.text}</div> <div class='message-sender'>- ${msg.sender.name}</div> </div>` ) }
fetchMessages
Before we start chatting, we need to see the messages that have come before and anything that was exchanged when we weren’t chatting with that particular user. Our fetchMessages method will grab the messages between our logged-in user and our selected user.
const fetchMessages = id => { if (!id) { return; } const limit = 30; const messagesRequest = new CometChat.MessagesRequestBuilder().setUID(id).setLimit(limit).build(); messagesRequest.fetchPrevious().then( messages => { const messageDiv = document.getElementById('messages'); messageDiv.innerHTML = messages.length > 0 ? messages.map(msg => newMessage(msg, id)).join('') : `<div class="whisper">Start of message history</div>`; messageDiv.scrollTop = messageDiv.scrollHeight }, error => { console.log("Message fetching failed with error:", error); } ); }
If for some reason we don’t have an id, we’ll return so as not to get errors. First we construct our request, setting the ID of the user we want to talk to, and the limit of messages we want to receive. More complicated applications would want to automatically fetch results from further back in time as the user scrolls.
Once our message requester is set up, we can call fetchPrevious to grab a list of messages. This returns messages, which we can use to populate our messages div. Each message is a JSON object with a sender.uid, sender.name and a text. We map through the messages and return them as HTML objects and replace whatever is inside messages with our new message node list. Remember to .join('') them or you’ll see a bunch of commas between divs. If there were no messages, we want to show the user that this is the “start of message history”.
Last, we want to scroll to the bottom of the messages div to show the user the latest messages.
Sending new messages
We’re logging in, selecting a user to chat with, fetching all the old message history between these two, and receiving any new messages sent to us from that user. Finally, we want to be able to send messages. Here’s how we do it:
const sendMessage = () => { const recipient_id = document.getElementsByClassName('bg-info')[0].id; const message_text = document.getElementsByName('message[text]')[0].value; document.getElementsByName('message[text]')[0].value = '' const messageType = CometChat.MESSAGE_TYPE.TEXT; const receiverType = CometChat.RECEIVER_TYPE.USER; const textMessage = new CometChat.TextMessage(recipient_id, message_text, messageType, receiverType); CometChat.sendMessage(textMessage).then( message => displayNewMessage(recipient_id, message), error => { console.log("Message sending failed with error:", error); } ); }
First, we determine which user we are chatting with, based on the highlighted user in the list. Next, we read the message from the form, and clear the form so it’s ready for the next message.
Our textMessage object will call CCP’s TextMessage method, constructing a message to send based on the logged-in user, receiver id, message text, and the types of message and recipient. Then we just sendMessagewith our textMessage object, wait for a message response, and render the message in the same way we would an incoming message from another user.
And that, my friends, is everything we need to install chat in our Rails app!
Conclusion
If you’ve been following along, you now have a fully-functional one-to-one chat app in your project. You can start exploring the other functionalities available through CometChat Pro, or you can start refactoring with jQuery, Slim, or other tools you may wish to incorporate to pare down the code. Hopefully seeing everything in plain Javascript made it clear what we are accomplishing, even if you want to have more efficient code in your own application.
Best of luck installing chat in your own app and have fun!
Links
Github repository with this code + user creation
Heroku deployment so you can see it running quickly. Try two browsers!
CometChat Pro documentation
HTTParty gem
0 notes
Text
Microsoft Azure Consultant
Job Title : Microsoft Azure Consultant Location : Nashville, TN Duration : Contract Note: ?US Citizens and those authorized to work in the US are encouraged to apply. We are unable to sponsor H1b visa?s at this time" Job Description: 1. To operationally support Infrastructure as Code for IAAS Windows & Linux, with Azure 2. To work / collaborate with UBS Azure engineering to deliver CI/CD pipelines for build artefacts using Azure DEVOPS for Production 3. To support a full Azure DEVOPS pipeline approach with tools, orchestration and deployment 4. To provide feedback to engineering on automated solutions around fabric management, subscription architecture and role based access in azure 5. Adopt / embrace / work with Azure cloud services (IaaS, PaaS / SaaS) 6. Communicate & support colleagues in embracing Azure as the future cloud platform for UBS. 7. Develop / enhance management interfaces using native tooling and languages (i.e. for log analytics etc.) 8. Exceptional knowledge in Azure portal administration 9. Migration knowledge either from on-prem to a cloud provider or from cloud to cloud, with a view to become a subject matter expert 10. Broad knowledge of Cloud (SaaS, IaaS and PaaS) solutions is a plus; extensive partner/vendor management experience is also welcomed. 11. Good knowledge of operationally supporting large scale Azure cloud projects and programs 12. Work in a team that will collaborate with stakeholders, engineering functions and the Cloud Business Office 13. Development skills for use with creation/enhancement of Policies, Queries, ARM templates, JSON, programming languages to interface with various API's and miscellaneous scripting languages e.g. Python and PowerShell 14. Administer Azure Active Directory 15. Conditional Access including RBAC models etc. 16. Multifactor Authentication 17. Active Directory management & replication and connections with private AD 18. User account administration 19. Group administration 20. System Monitoring & Management 21. Policy creation / enhancement 22. Compliance automation 23. Programming languages, used with ARM templates, JSON, API integration, query and scripting languages and general IaC code enhancement 24. Investigate and report on all alerts 25. Incident Management 26. Release Management 27. Configuration Management 28. Availability Management 29. Patch & Update Management 30. Monitor and respond to critical emails/issues off hours 31. Azure core services including networking, Storage, Policies, Azure DevOps, Database, Middleware, servers etc. at a best practices level (in-depth support in items like SQL etc. is not essential) 32. Skills standardization, automation general platform management across Azure services Reference : Microsoft Azure Consultant jobs source http://jobrealtime.com/jobs/technology/microsoft-azure-consultant_i3212
0 notes
Text
Microsoft Azure Consultant
Job Title : Microsoft Azure Consultant Location : Nashville, TN Duration : Contract Note: ?US Citizens and those authorized to work in the US are encouraged to apply. We are unable to sponsor H1b visa?s at this time" Job Description: 1. To operationally support Infrastructure as Code for IAAS Windows & Linux, with Azure 2. To work / collaborate with UBS Azure engineering to deliver CI/CD pipelines for build artefacts using Azure DEVOPS for Production 3. To support a full Azure DEVOPS pipeline approach with tools, orchestration and deployment 4. To provide feedback to engineering on automated solutions around fabric management, subscription architecture and role based access in azure 5. Adopt / embrace / work with Azure cloud services (IaaS, PaaS / SaaS) 6. Communicate & support colleagues in embracing Azure as the future cloud platform for UBS. 7. Develop / enhance management interfaces using native tooling and languages (i.e. for log analytics etc.) 8. Exceptional knowledge in Azure portal administration 9. Migration knowledge either from on-prem to a cloud provider or from cloud to cloud, with a view to become a subject matter expert 10. Broad knowledge of Cloud (SaaS, IaaS and PaaS) solutions is a plus; extensive partner/vendor management experience is also welcomed. 11. Good knowledge of operationally supporting large scale Azure cloud projects and programs 12. Work in a team that will collaborate with stakeholders, engineering functions and the Cloud Business Office 13. Development skills for use with creation/enhancement of Policies, Queries, ARM templates, JSON, programming languages to interface with various API's and miscellaneous scripting languages e.g. Python and PowerShell 14. Administer Azure Active Directory 15. Conditional Access including RBAC models etc. 16. Multifactor Authentication 17. Active Directory management & replication and connections with private AD 18. User account administration 19. Group administration 20. System Monitoring & Management 21. Policy creation / enhancement 22. Compliance automation 23. Programming languages, used with ARM templates, JSON, API integration, query and scripting languages and general IaC code enhancement 24. Investigate and report on all alerts 25. Incident Management 26. Release Management 27. Configuration Management 28. Availability Management 29. Patch & Update Management 30. Monitor and respond to critical emails/issues off hours 31. Azure core services including networking, Storage, Policies, Azure DevOps, Database, Middleware, servers etc. at a best practices level (in-depth support in items like SQL etc. is not essential) 32. Skills standardization, automation general platform management across Azure services Reference : Microsoft Azure Consultant jobs source http://www.qoholic.com/jobs/technology/microsoft-azure-consultant_i4711
0 notes
Text
Microsoft Azure Consultant
Job Title : Microsoft Azure Consultant Location : Nashville, TN Duration : Contract Note: ?US Citizens and those authorized to work in the US are encouraged to apply. We are unable to sponsor H1b visa?s at this time" Job Description: 1. To operationally support Infrastructure as Code for IAAS Windows & Linux, with Azure 2. To work / collaborate with UBS Azure engineering to deliver CI/CD pipelines for build artefacts using Azure DEVOPS for Production 3. To support a full Azure DEVOPS pipeline approach with tools, orchestration and deployment 4. To provide feedback to engineering on automated solutions around fabric management, subscription architecture and role based access in azure 5. Adopt / embrace / work with Azure cloud services (IaaS, PaaS / SaaS) 6. Communicate & support colleagues in embracing Azure as the future cloud platform for UBS. 7. Develop / enhance management interfaces using native tooling and languages (i.e. for log analytics etc.) 8. Exceptional knowledge in Azure portal administration 9. Migration knowledge either from on-prem to a cloud provider or from cloud to cloud, with a view to become a subject matter expert 10. Broad knowledge of Cloud (SaaS, IaaS and PaaS) solutions is a plus; extensive partner/vendor management experience is also welcomed. 11. Good knowledge of operationally supporting large scale Azure cloud projects and programs 12. Work in a team that will collaborate with stakeholders, engineering functions and the Cloud Business Office 13. Development skills for use with creation/enhancement of Policies, Queries, ARM templates, JSON, programming languages to interface with various API's and miscellaneous scripting languages e.g. Python and PowerShell 14. Administer Azure Active Directory 15. Conditional Access including RBAC models etc. 16. Multifactor Authentication 17. Active Directory management & replication and connections with private AD 18. User account administration 19. Group administration 20. System Monitoring & Management 21. Policy creation / enhancement 22. Compliance automation 23. Programming languages, used with ARM templates, JSON, API integration, query and scripting languages and general IaC code enhancement 24. Investigate and report on all alerts 25. Incident Management 26. Release Management 27. Configuration Management 28. Availability Management 29. Patch & Update Management 30. Monitor and respond to critical emails/issues off hours 31. Azure core services including networking, Storage, Policies, Azure DevOps, Database, Middleware, servers etc. at a best practices level (in-depth support in items like SQL etc. is not essential) 32. Skills standardization, automation general platform management across Azure services Reference : Microsoft Azure Consultant jobs source http://linkhello.com/jobs/technology/microsoft-azure-consultant_i3394
0 notes